Painting a car is a real art. Basically, having this job done costs several thousands of pounds. Depending on which car has to be painted and how much time it can take, you might consider doing this yourself. Perfectly painting a new car is not feasible with your own limited means. But even if you require professional lacquering you can save a great deal of money by performing the right preparations in your home garage. In this manual you learn everything you need to know of how to paint a car yourself.
How to paint a car yourself – Know the limits
 Before you start painting, you need to know what results you can expect. Painting a new car or professional repair painting is only possible with the right material. It is an illusion to believe you can attain the same result as in a professional garage with a few household products in your home garage. Do not paint a car yourself if
| – you wish to sell the car |
| – it is not your own car |
| – the car is used for representative purposes |
| – it is a luxury car |
 DIY paintwork ALWAYS shows up and in most cases results in a serious loss of value of the car. Commercial and utility vehicles are an exception to this. If you want to upgrade a vehicle in your home garage with paintwork, please limit yourself to tractors, dredging vehicles, trucks or delivery vans. A strongly corroded Sprinter, Transit or Ducato is an excellent practising object for DIY paintwork.

Car spares & repair partscheap and fast shippingLow prices + fast delivery ⇒ |
How to paint a car yourself?
There are three working methods for giving your car a new colour. These methods are:
| – spraying |
| – rolling |
| – wrapping |
![]() To say in advance: a meticulously roller-painted car does not necessarily look worse than a car sprayed with semi-professional tools. Roller painting is considerably simpler and requires less preparation.
To say in advance: a meticulously roller-painted car does not necessarily look worse than a car sprayed with semi-professional tools. Roller painting is considerably simpler and requires less preparation.
Adequate preparation is 90 percent of the job
 When you paint a car yourself, preparation is more important than all the rest. Every negligence irrevocably leads to dramatically worse results which can only very difficultly can be repaired. Therefore, ninety percent of the time reserved for the paintwork should be dedicated to preparation. Basically, painting a normal family car is two days’ work.
Step 1: Washing the car The car should not be just clean, but shiningly clean in order to be painted. Manual washing or a visit to the car wash are preferred. When going through the car wash, see to it that the hot waxing is switched off! The car should not be just clean, but shiningly clean in order to be painted. Manual washing or a visit to the car wash are preferred. When going through the car wash, see to it that the hot waxing is switched off! |
Step 2: Detach all removable parts You save yourself a lot of time if you remove all removable components: lights, blinkers, decorative strips, spray nozzles, hubcaps, windshield wipers, and possibly door handles as well. So everything removed won’t be accidentally painted. This is a good occasion for identifying damaged components and possibly their replacement. Removing the windows is not necessary. You save yourself a lot of time if you remove all removable components: lights, blinkers, decorative strips, spray nozzles, hubcaps, windshield wipers, and possibly door handles as well. So everything removed won’t be accidentally painted. This is a good occasion for identifying damaged components and possibly their replacement. Removing the windows is not necessary. |
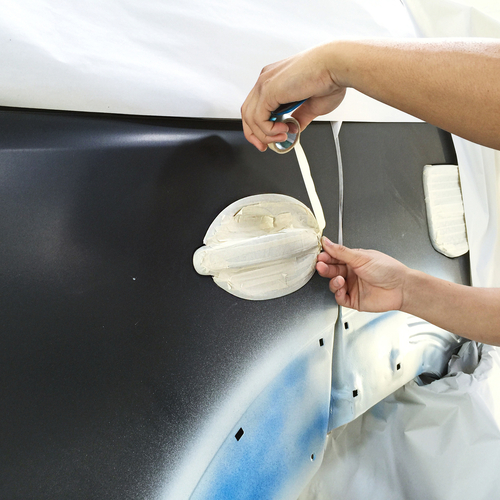
Step 3: Taping over, as thoroughly as possible Now the car is taped over. High-grade crepe tape is most suitable to do this, as it can easily be removed. Tape over the windows including the window rubbers. If the headlights and rear lights have been removed as well, tape over the hollow spaces on the inside. This saves paint. A roof bar which couldn’t be removed, deserves extra attention. Now the car is taped over. High-grade crepe tape is most suitable to do this, as it can easily be removed. Tape over the windows including the window rubbers. If the headlights and rear lights have been removed as well, tape over the hollow spaces on the inside. This saves paint. A roof bar which couldn’t be removed, deserves extra attention. |
Step 4: Repairing dents and filling Paintwork accentuates dents. Investing sufficient time and effort to remove all dents or fill them, you ultimately have a much better result. Be sure to beat out the dents and do as little filling as possible. This always provides the best results. Paintwork accentuates dents. Investing sufficient time and effort to remove all dents or fill them, you ultimately have a much better result. Be sure to beat out the dents and do as little filling as possible. This always provides the best results. |
Step 5: Sanding In order to allow the new paint to firmly adhere to the old layer, it should be roughened. Use 400- or 600-grit sandpaper and a sanding block. Only work by hand. At corners and edges, the paintwork has been applied thinner, and therefore at these spots you reach the plating sooner. This should be avoided at all cost. In order to allow the new paint to firmly adhere to the old layer, it should be roughened. Use 400- or 600-grit sandpaper and a sanding block. Only work by hand. At corners and edges, the paintwork has been applied thinner, and therefore at these spots you reach the plating sooner. This should be avoided at all cost. |
Step 6: Remove fat with silicon cleaner With silicon cleaner you not only remove the dust from sanding and filling. It also reliably degreases the car. A car must be completely grease-free to be painted. So be generous with the silicon cleaner.Now the moment has come when you need to decide on how to proceed. The car is now prepared for painting. Bringing the car to the garage, taped over, filled, sanded and cleaned, you can count on saving 50 to 70 %. A 2000 euro lacquer job will then cost only 500 – 700 euro. If you intend to sell the car and want to increase its value drastically, you need to leave the rest to the professional. If this is a vehicle intended for your own use or recreation, you can proceed with your own means. With silicon cleaner you not only remove the dust from sanding and filling. It also reliably degreases the car. A car must be completely grease-free to be painted. So be generous with the silicon cleaner.Now the moment has come when you need to decide on how to proceed. The car is now prepared for painting. Bringing the car to the garage, taped over, filled, sanded and cleaned, you can count on saving 50 to 70 %. A 2000 euro lacquer job will then cost only 500 – 700 euro. If you intend to sell the car and want to increase its value drastically, you need to leave the rest to the professional. If this is a vehicle intended for your own use or recreation, you can proceed with your own means. |
Step 7: Prepare the workshop For painting a car yourself you need at least a roof over your head. A closed space is ideal, a car port or a garden pavilion are adequate alternatives. Tape the walls with construction foil. Lacquer always needs time to harden. During this period, no insects, foliage or dust should come into contact with the car. Spray painting produces plenty of spray mist settling everywhere. If you are not working outside, tape the entire space with construction foil, creating a space which is sufficiently clean for painting. If painting with a roller or wrapping, you can skip the foil. For painting a car yourself you need at least a roof over your head. A closed space is ideal, a car port or a garden pavilion are adequate alternatives. Tape the walls with construction foil. Lacquer always needs time to harden. During this period, no insects, foliage or dust should come into contact with the car. Spray painting produces plenty of spray mist settling everywhere. If you are not working outside, tape the entire space with construction foil, creating a space which is sufficiently clean for painting. If painting with a roller or wrapping, you can skip the foil. |
8.1. Roller-painting the car An extensive choice of colours is suitable for application with a roller. These colours can often be mixed. For buses and vans, cheap, white radiator paint is very suitable. You need: An extensive choice of colours is suitable for application with a roller. These colours can often be mixed. For buses and vans, cheap, white radiator paint is very suitable. You need:– a foam paint roller for smooth surfaces – a velvet paint roller for rough surfaces – paint basin – newspapers When paint-rolling there is no need for a mouth cap. Lay down newspapers around the car to avoid soiling the ground. Begin with the car roof and work downwards. Apply the paint crosswise to ensure a full cover. |
8.2. Spray-painting a car If this concerns only touching up smaller damage spots, you can always use spray cans. It important to always paint the entire bodywork part. Work from joint to joint and carefully tape off the rest. Keep ca. 30 cm distance to avoid dripping. If this concerns only touching up smaller damage spots, you can always use spray cans. It important to always paint the entire bodywork part. Work from joint to joint and carefully tape off the rest. Keep ca. 30 cm distance to avoid dripping.
For completely spray-painting a car you need a compressor, a spray-paint gun and a mixing bucket for mixing the paint with thinner and hardener. Wear protective clothing over your entire body and use a mouth cap. Work from the top downwards and apply crosswise. |
8.3. Wrapping a car Wrapping a car is the cleanest and most efficient way to upgrade the exterior of your car in the home garage, although bubble-free application of wrapping foil requires plenty of practice. It isn’t a cheap solution either, though with the necessary skill you reach impeccable results with this method. Wrapping a car is the cleanest and most efficient way to upgrade the exterior of your car in the home garage, although bubble-free application of wrapping foil requires plenty of practice. It isn’t a cheap solution either, though with the necessary skill you reach impeccable results with this method. |
9. Finishing the car With very fine-grained sandpaper and an adequate polisher, you can always upgrade DIY paintwork. In case of matte paint this is not possible. Actually, matte paint is more something for the last owner of the car. With very fine-grained sandpaper and an adequate polisher, you can always upgrade DIY paintwork. In case of matte paint this is not possible. Actually, matte paint is more something for the last owner of the car. |
 How to paint a car yourself – all facts in an overview
| When to paint a car yourself? – If the car is not sold further – If it is an older car for commercial use |
| What methods are available? Roller painting Spray painting Wrapping |
| Where is painting possible? Where you have at least a roof over your head |
| What do I need for paintwork? Plenty of time, thorough preparation, adequate material and tools |
| What does DIY paintwork cost? Between 50 and 500 euro and two days of your time |
| Advantages of DIY paintwork – Cheap – Quick – Creative |
| Disadvantages of DIY paintwork – Loss of the car value – Results may not always be optimal – Time-consuming |
| What is the best way? Preparing the car for the paint job and leaving the rest to professionals. |
Foto: PongMoji, samnao, ignatius 63, TZIDO SUN, -Taurus-, KG Design, MongPro, sima, ipuwadol, Igorsky, feelphoto2521, Dmitry Kalinovsky, Ikonoklast Fotografie, Nattzkamol / shutterstock.com


